Contents
- 🔥 Don’t miss this: mavic.ai now supports TikTok!
- Import Products from Shopify, Chat with Documents and Major Mavic Facelift
- Publish to BlueSky Social with Mavic!
- Automate Competitor Analysis with mavic!
- New product feature - AI Image Generator & Image Editor Upgrade
- Team management upgrade - manage multiple brands
- Did someone say... X?
- Content Editor 3.0 - Supercharge your creativity with customized content and multichannel posting!
- New feature release - generate blogs with a few clicks! 🎉
- A smarter dashboard for a smarter you 🤓
- Video publishing is now available!
- Get social with mavic
- 😉📘
- 🚀 Chat with mavic, enhanced idea playground and banlist 🚀
- 🚀 mavic 2.0 - building the world's first AI brand marketer 🚀
- 🔥 Announcing mavic 2.0 🔥 UX makeover, Instagram publishing and branded uploads
- 📢📢📢 Get on the brand-wagon with our latest feature drops!
- 🎉 Major Update 🎉 Magic Generator, Image-to-Caption, Instant content preview and more!
- 🎨 Brand Kit, Quotes and New Instagram/LinkedIn Carousel Styles
- ✌️😎 New Features: Brand Name Ideation, Product Catalogue and Content Themes! 😎✌️
- 🚀 New LinkedIn Text Post Generation and More Content Styles! 🚀
- Welcome to mavic.ai - Let's get started! 💫
🔥 Don’t miss this: mavic.ai now supports TikTok!
2025-02-18
We're so excited that the TikTok integration with mavic.ai is finally live! 🎬🔥
Now you can:
✅ Create & Schedule TikTok content effortlessly within mavic.ai.
✅ Post Across Multiple Platforms—TikTok, Instagram, Facebook, and more, all in one go.
✅ Track & Optimize Performance with mavic’s social media analytics.
Integrating Tiktok with mavic.ai
1. Go to the side navigation bar, scroll down to Integrations
2. Click Connect and select TikTok
3. You will be redirected to TikTok's login page.
4. Log into your account.
5. TikTok will appear on your list of connected social media channels
Posting on TikTok with mavic.ai
1. Upload a video by dragging or clicking the '+' icon
2. Configure your TikTok 'channel settings' according to your preference
3. Fill in your caption
4. Click 'schedule' to post
5. Track your TikTok account analytics by selecting 'socials' on the side navigation bar. Then select your TikTok channel.
No more switching between apps—manage your entire social media strategy from one place!
💡 Ready to supercharge your TikTok marketing?
Import Products from Shopify, Chat with Documents and Major Mavic Facelift
2025-01-09
🥁 🥁 🥁 Drumroll… presenting the first product release of 2025! 🥳
In this release note, you’ll find these major updates:
Import products in bulk from Shopify
Regenerate brand report
Use documents such as reports, presentations, proposals within Chat, Idea Playground, Post Generation and Customer Profile Generation, allowing Mavic to analysis and perform AI-driven tasks based on the document
Import Products in Bulk from Shopify 🛒
You can now import product information from Shopify into Mavic for bulk product creation!
Simply use the sample.csv format to manage your product details, and upload the file into Products page.
Note that the processing may take some time before the newly added products are shown!
Regenerate Your Brand Reports 🔍
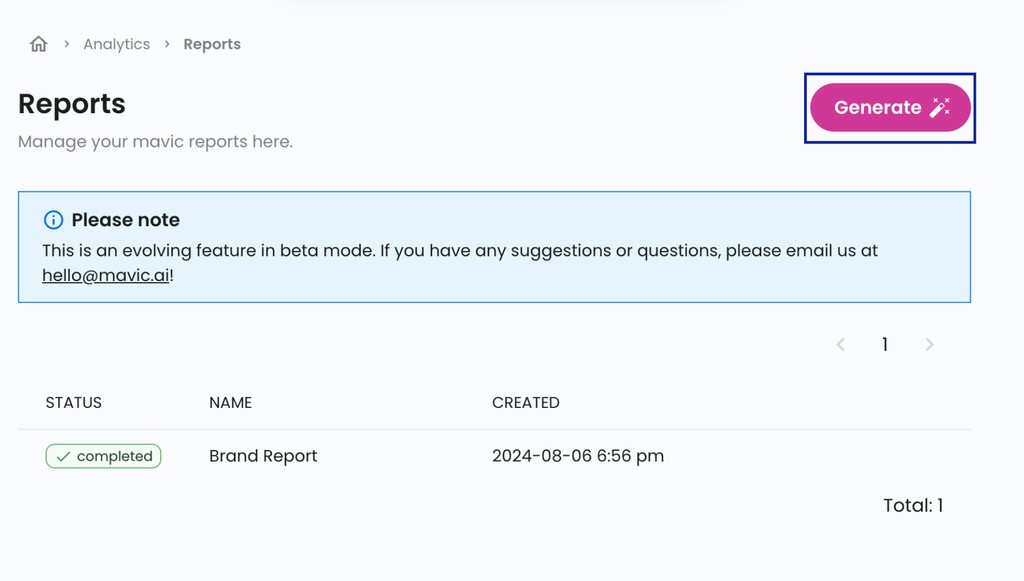
Now you can create new brand reports in Mavic! To regenerate, simply click on the ‘Generate’ button within the reports page. This allows your to refresh your reports whenever needed.
💥 Use Documents for AI-Powered Actions💥
You can now share your documents such as reports, presentations and proposals to Mavic to be analyzed and used in the following actions:
Generate Customer Profiles
Start creating > Generate posts
Start creating > Generate content ideas
Chat
Idea playground
1️⃣ Generate Customer Profiles
With this feature, you can now share your owned reports on your customers, and use Mavic to create different profiles to be used in marketing.
You can also use relevant industry or trends reports to get suggestions on new customer profiles.
2️⃣ Generate Posts
Have a report or study you want to transform into posts? Or customer testimonials you want to convert into content? Now you can!
Upload relevant documents into the post generator and select the type of content you want to create from the attachment.
3️⃣ Generate Ideas / Chat
You can also look for the updated feature within the Idea Playground and Chat.
With this new feature, you get a powerful new way to conduct different strategic marketing tasks such as:
📍 Use market research findings to create ideas for marketing engagement such as webinars or other activities
📍 Analyze industry reports and extract key insights
📍 Summarize documents quickly and create executive reports
📍 Combine custom reports and your real-time data within mavic’s chat for comprehensive analysis
✨ What’s Upcoming in 2025? ✨
What an amazing first year it’s been, and we're so excited at what's coming next. Prepare yourself for the stunning Mavic facelift – here's a sneak peek at what you absolutely can’t miss:
TikTok Integration
WooCommerce Product Import
Workflow Automations
Bulk Creations
and so much more!
Stay tuned for this massive upgrade! If you want to be part of our exclusive beta testers for the upcoming Mavic facelift, send us an email at hello@mavic.ai with the subject ‘Count me in for Mavic 2025!’ and we'll get back to you!
Publish to BlueSky Social with Mavic!
2024-12-12
Mavic now supports content publishing to BlueSky! You can create, schedule and publish content in your brand voice faster and easier.
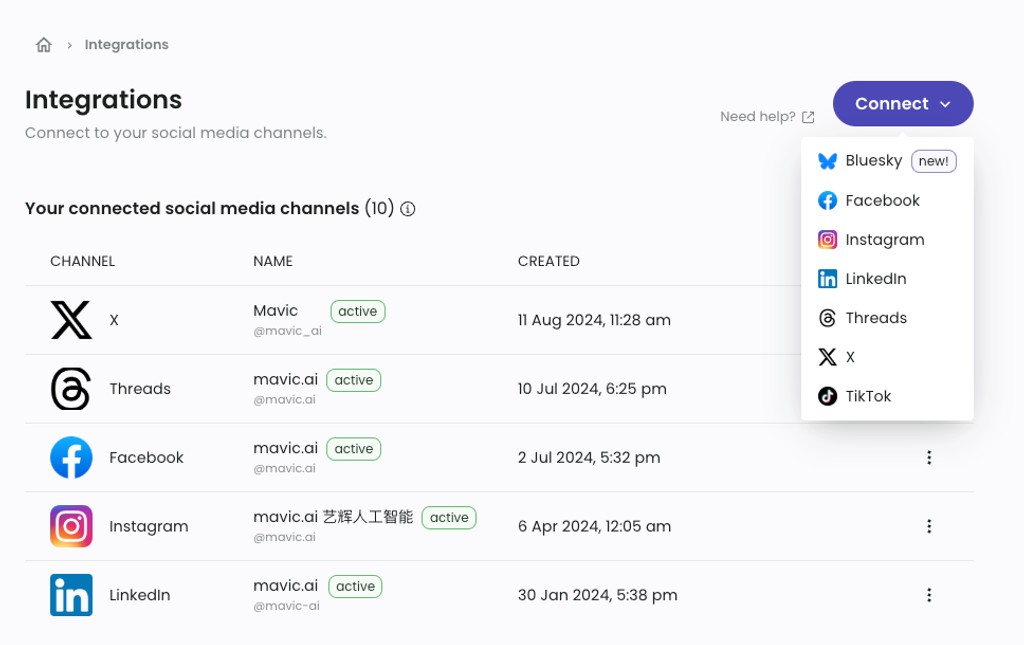
To get started, first connect your Bluesky handle under ‘Integrations’.
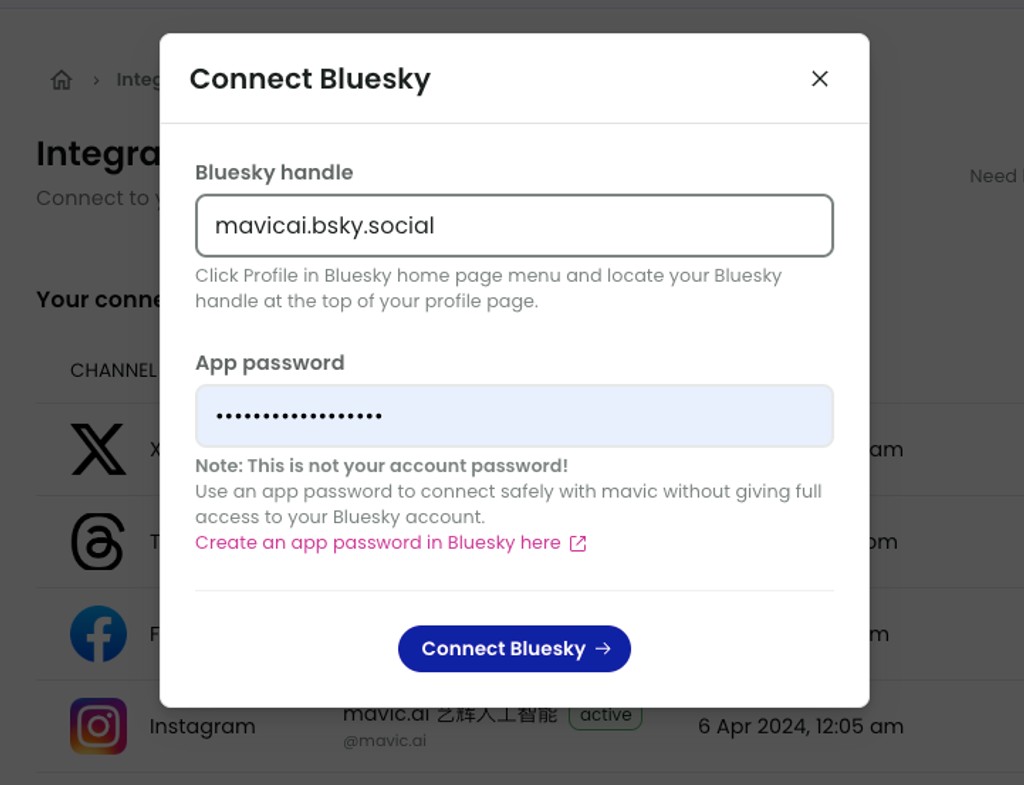
Enter your Bluesky handle and app password.
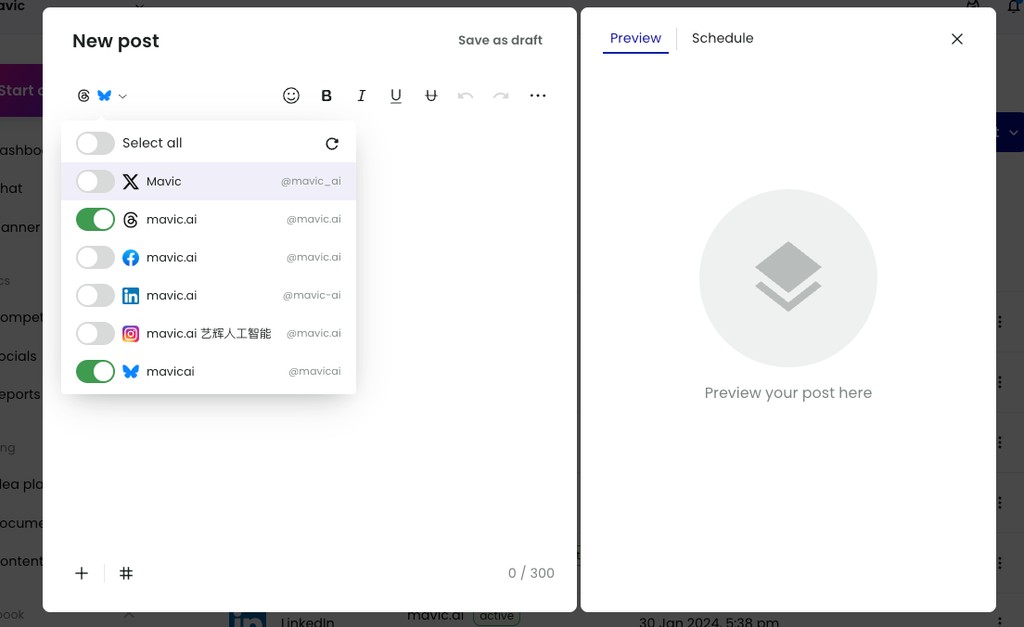
Once connected successfully, you can select Bluesky as a channel for posting content.
Have fun with Bluesky!
Automate Competitor Analysis with mavic!
2024-12-04
Automate your competitor analysis with mavic
Get smarter 🤓 at tracking competitors with mavic! Here’s what you can expect in our latest feature enhancement:
New location of ‘Competitors’ - now moved to ‘Analytics’
Upgraded data visualization - view competitor visits, unique visitors, average visit duration, pages per visit and bounce rate on a monthly basis
Toggle between charts and tables
View in-depth competitor scorecards - feature still in development… stay tuned!
Chat with your competitor data
Manually add competitor social channels
Access enhanced Competitors feature within Analytics module
The competitor feature has also been enhanced with new charts, which you can toggle between charts to view trends, and table format to view data totals across all competitors.
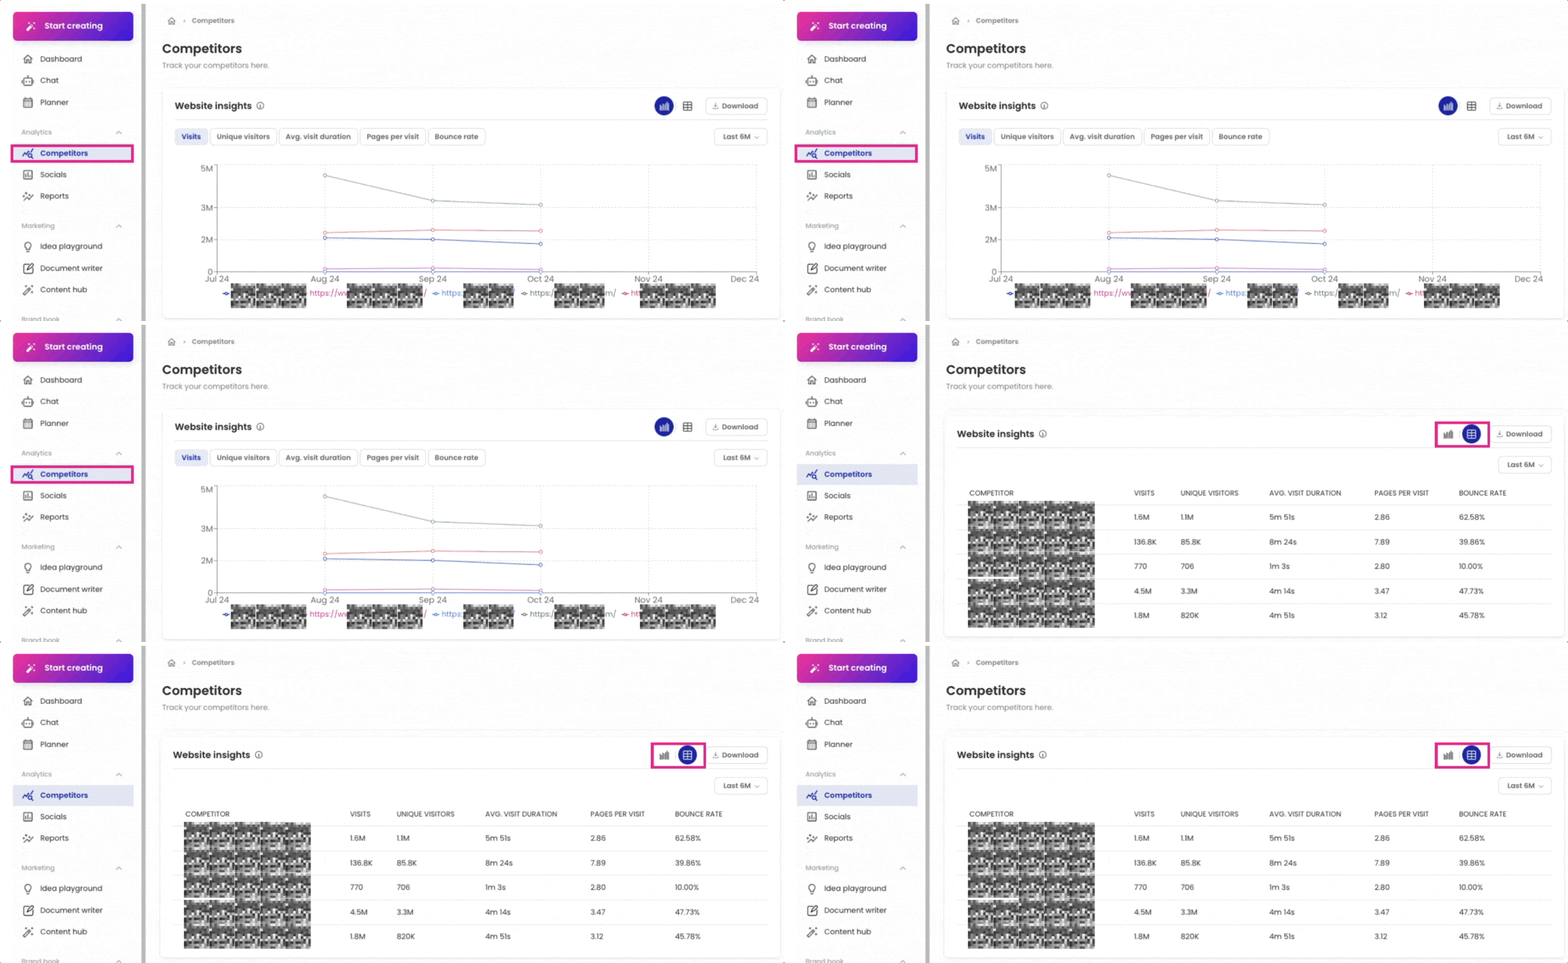
Note: data is updated approximately a week after the end of the month.
Access competitor in-depth data by clicking on their names
Click on the list below to access the individual competitor data.
Chat with your website traffic data
Using the prompt ‘website traffic data’ you will be able to bring the competitor’s website data into Chat to conduct discussions and further analysis.
Edit competitor information by manually inputting any missing social media channels
Now you can edit the competitor social information to provide mavic with more robust and in-depth information about your competitors.
Remember to click ‘Save’ once you’re done!
Note that this is an evolving feature and you can expect more updates along the way! If you have any suggestions or requests, feel free to provide them via the in-app chat on the bottom right side of the platform. 💖
New product feature - AI Image Generator & Image Editor Upgrade
2024-11-22
AI Image Generator is now LIVE via image editor
Need to create images for your social posts? With our new AI image generator, you can!
Watch the full tutorial below on YouTube via this link.
Our AI image generator can be located within image editor here.

We currently support 3 modes of AI image generation:
Text to image
Image to image
Product to image
Text to image
Use written descriptions to explain the type of visuals you’re looking for.
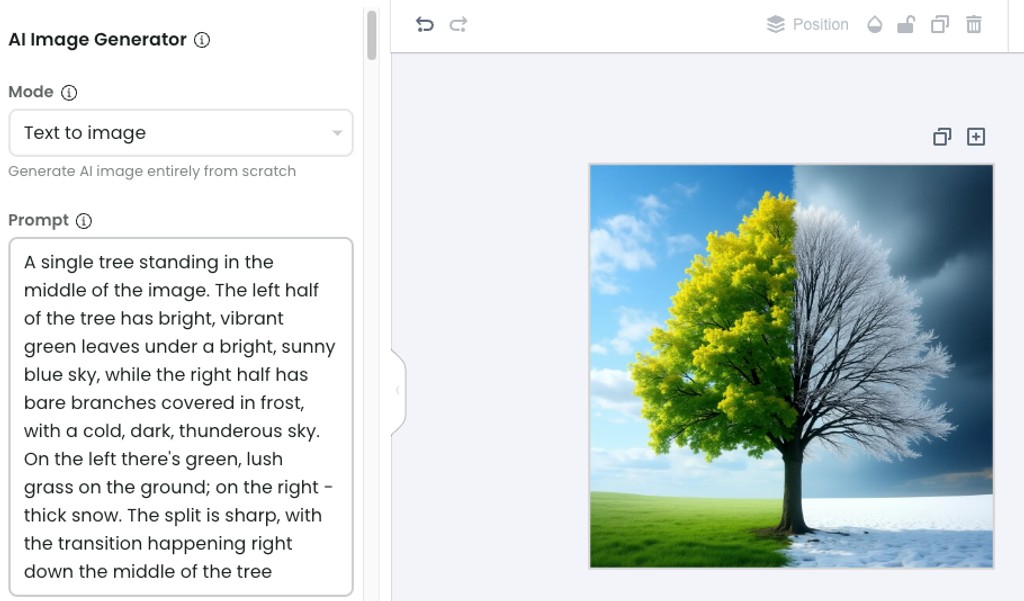
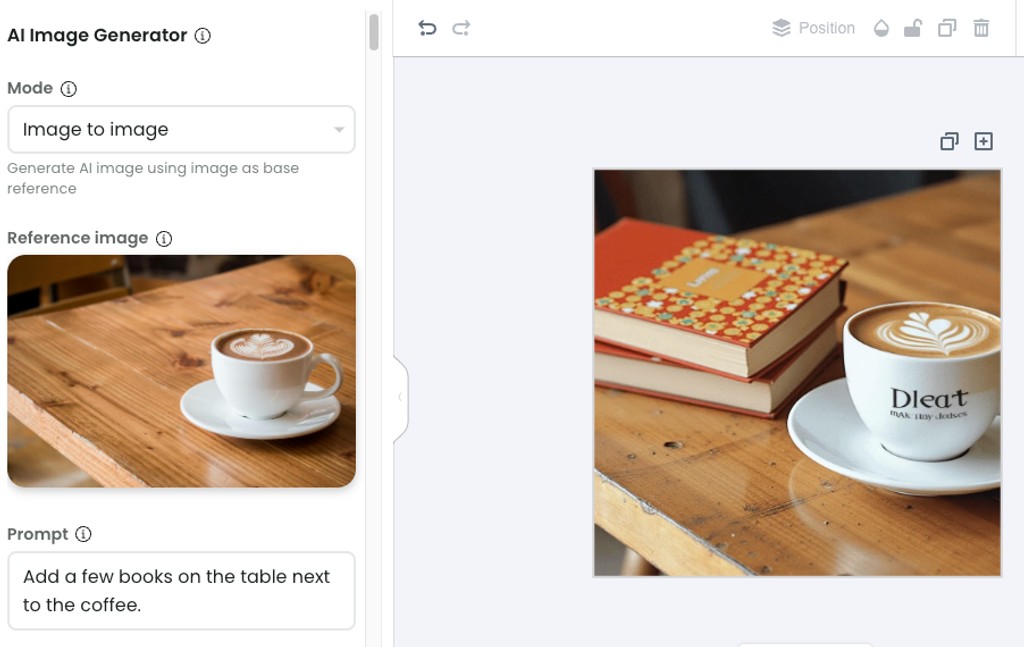
Image to image
Transform existing images into new, creative versions.
Product to image
Create variations of your product image.
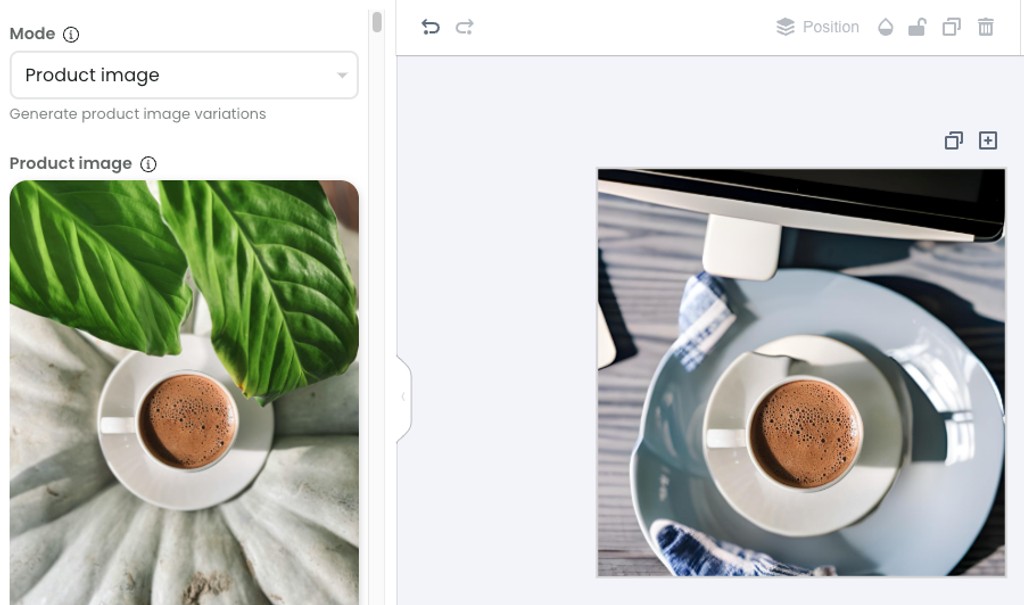
Image Editor Enhancement - Remove Background
To look for the enhancement, click on the image, the 3 dots next to the clone icon, and you’ll find ‘Remove background’.
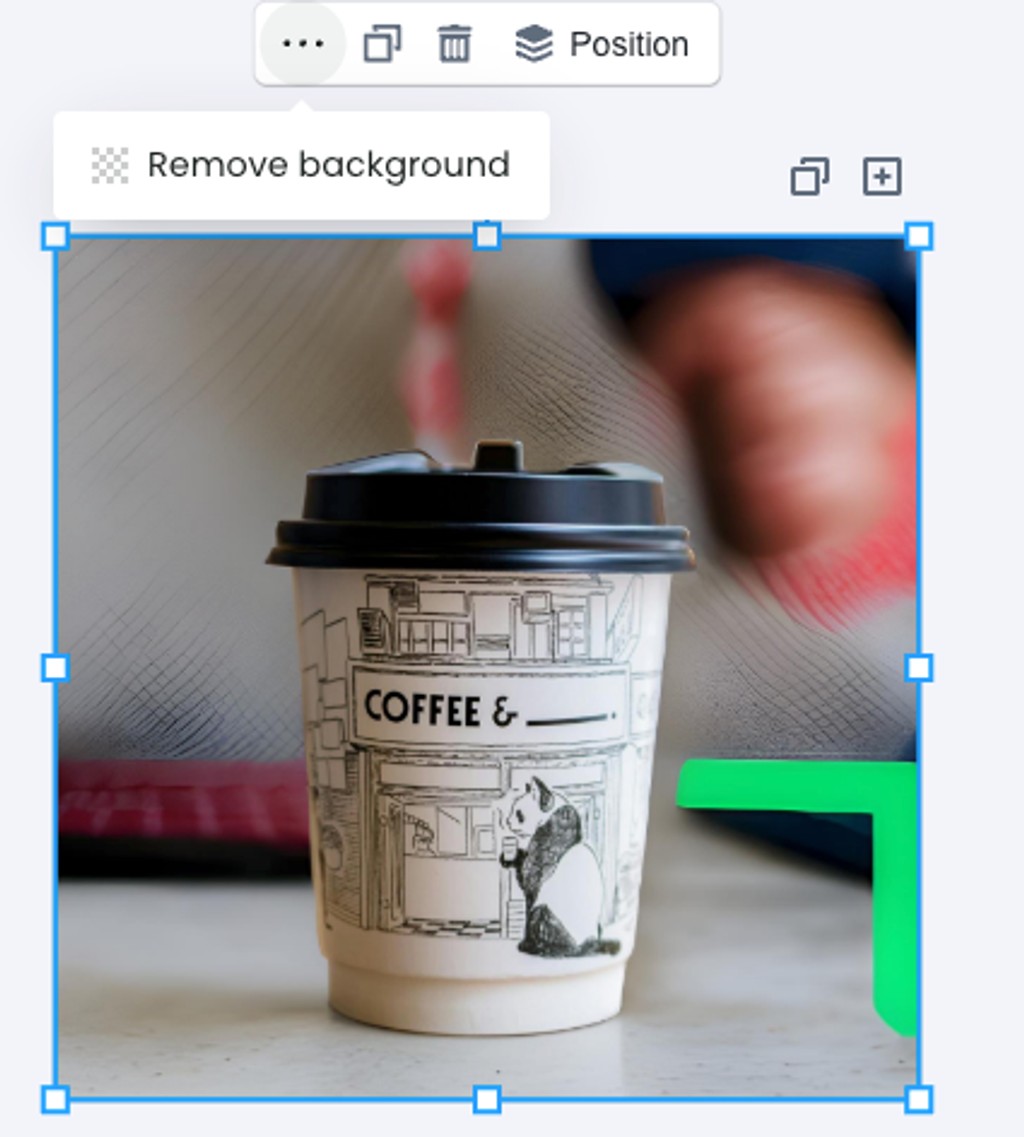
Please stay tuned for more updates coming soon!
Team management upgrade - manage multiple brands
2024-11-21
Easily manage multiple team members and brands
Looking to streamline management across multiple brand teams? Our latest product release empowers users on Team plans and above to efficiently oversee their brands by:
Adding users directly to brands
Managing credits allocation by brands
Watch the full tutorial below, or on YouTube here.
Add Users to Brands
Now you can add users directly to your brands by clicking on the brand dropdown on the top left, and navigate to ‘Invite user’ or ‘Settings’.
Once you click on ‘Invite user’, you will see this pop-up.
There are 3 different types of brand roles:
Administrator - Super user which has full access over the brand
Member - Similar to Administrator, except cannot invite users to brand workspaces
Viewer - View only access, unable to take any action
Mavic allows you to add unlimited viewers to your brand workspaces, so you can easily share progress of your brand projects.
Allocate credits for different brands
Now that you have different brand workspaces, you may want to create brand-specific credit limits to ensure your credits last throughout the month.
By default, all brands within your team will share from the same credit pool. However, if you want to allocate specific to limits to specific brands, you can do it by going to your Team settings > Brands.

Once you’re within brands, you can see an edit icon on the right.
Click on it to edit the maximum credits this brand can use on a monthly basis. Remember to save to take effect!
Once the limits are in place, it will show up within the brand workspace settings too, under Limits.
This is an evolving feature, and if you’d like to share any feedback, please write in to hello@mavic.ai, or via the in-app chat! ✨
Did someone say... X?
2024-10-20
More integrations, more data, more insights!
We’re going beyond ideation and content, and getting real smart 🤓 In our latest drop, you will get access to:
X integration
Instagram Analytics
Demographics data upgrade
X Integration 🎉
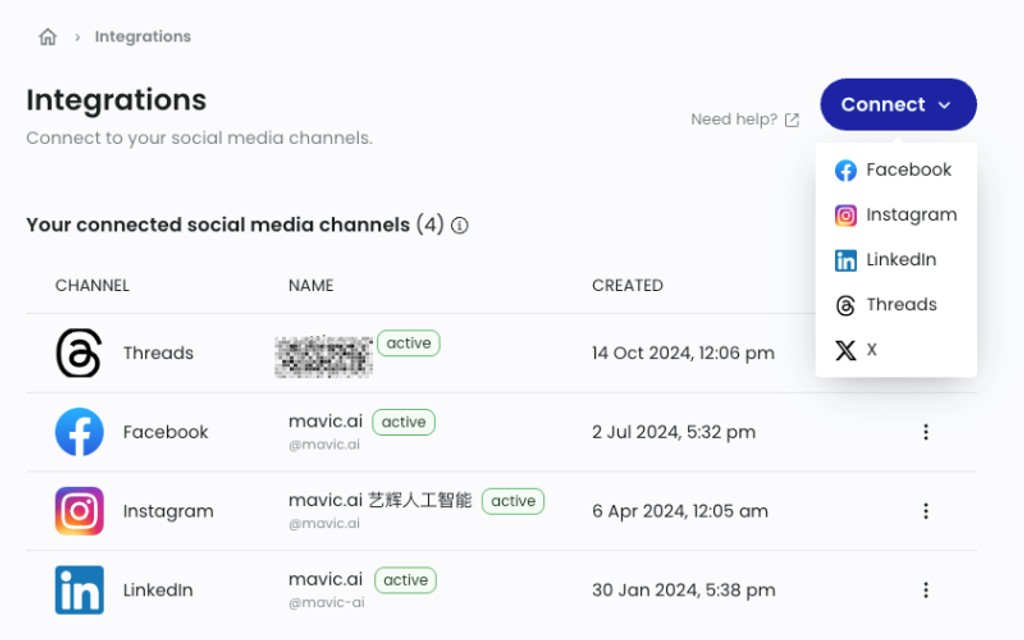
You can now connect X to your integrations if you currently have a paid subscription with mavic.
Once X is integrated, you will be able to select the channel option when generating posts, and either schedule or directly publish. Please note these limits for X:
Existing subscribers - unlimited published posts
Appsumo subscribers - 50 published posts monthly per tier, up to 250 posts
Get Real with Instagram Analytics 🔮
You read that right, Instagram Analytics is now available in mavic!
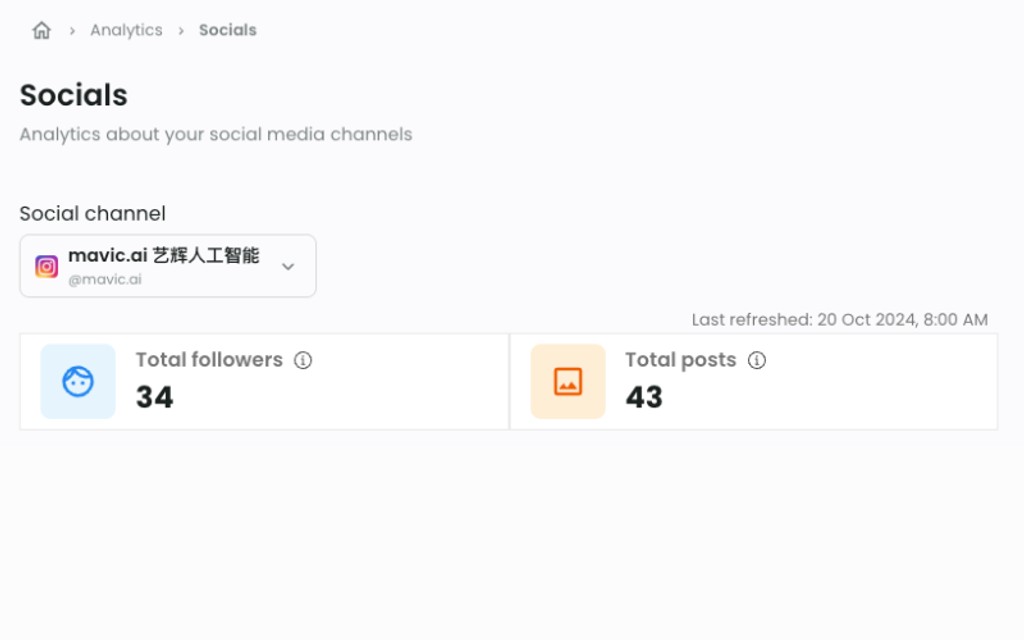
If your socials are connected, you will be able to select Instagram from the dropdown menu and view your analytics. Metrics include:
Total followers
Total posts
Followers demographics - by country, age, city and gender
Reached audience demographics - by country, age, city and gender
Impressions
Reach
Profile visits
Email clicks
Website clicks
Get direction clicks
Phone call clicks
Text message clicks
Current posting streak
Published posts and its metrics:
Impression
Reach
Engagement Rate
Likes
Comments
Reposts
Total Engagement
Saves
Get Personal with your LinkedIn Community
Need more understanding of who’s in your LinkedIn community? You can now view demographics of your LinkedIn page followers! 🫂
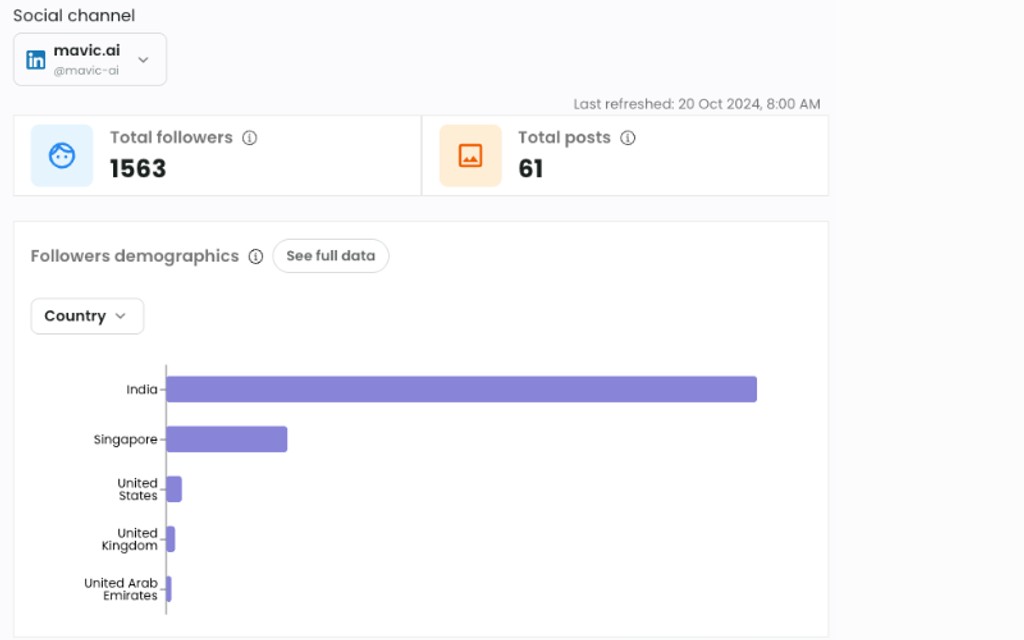
Follower demographic metrics include:
Country
Industry
Job Function
Region
Seniority
Company Size
Please stay tuned as there will be more exciting updates coming up very soon. If you want to see what’s next on our product roadmap, head over here for more details!
Content Editor 3.0 - Supercharge your creativity with customized content and multichannel posting!
2024-09-24
CONTENT EDITOR 3.0 IS NOW LIVE!
Thanks to the great feedback from the mavic community, we’ve fine-tuned our content editor and built a better, faster, easier-to-use interface. Let’s dive into what you get with this brand-new upgrade 🔥
✨ A summary of our latest drop ✨:
Multichannel publishing
🧨 Artifact-type AI content creation
Select brand templates before AI creation
Personalized templates before AI creation
Text formatting for social channels
Hashtag group
Customization for single social channels
Quick Access Content Creation Button
Get to what you need quickly when you click on ‘Start creating’.
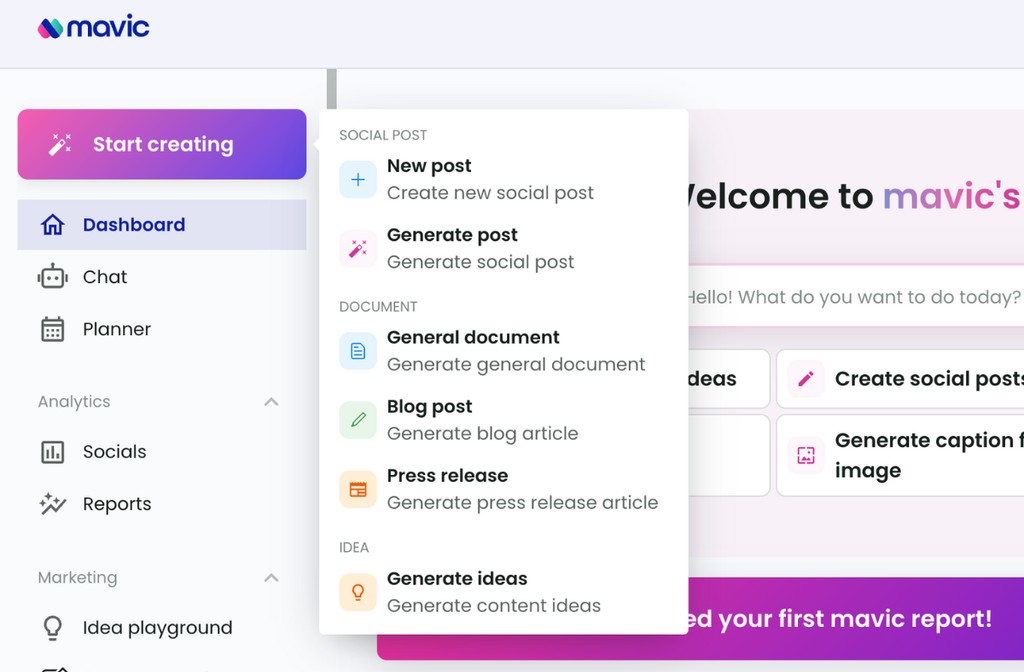
New post: creates content manually from scratch
Generate post goes into AI-powered creation workflow
🧨 AI Supercharged Content Editor 🧨
The fastest way to understand what’s new is to watch this 2-minute video.
What’s new in generate content workflow?
Start creating new post from topic / saved ideas, uploaded images, or website reference
Select saved brand data as part of AI context
If images are required, select from saved templates, or create your own template!
Selected template will be used in AI post creation
Easily provide required feedback and changes, and watch mavic implement the necessary changes!
Once content is updated, proceed to publish post
Make additional edits on both images and text if necessary
Here’s another example of generating a post with AI, this time using an image upload.
Multichannel publishing & more editor upgrades!
You can now select multiple channels when creating a post from scratch.
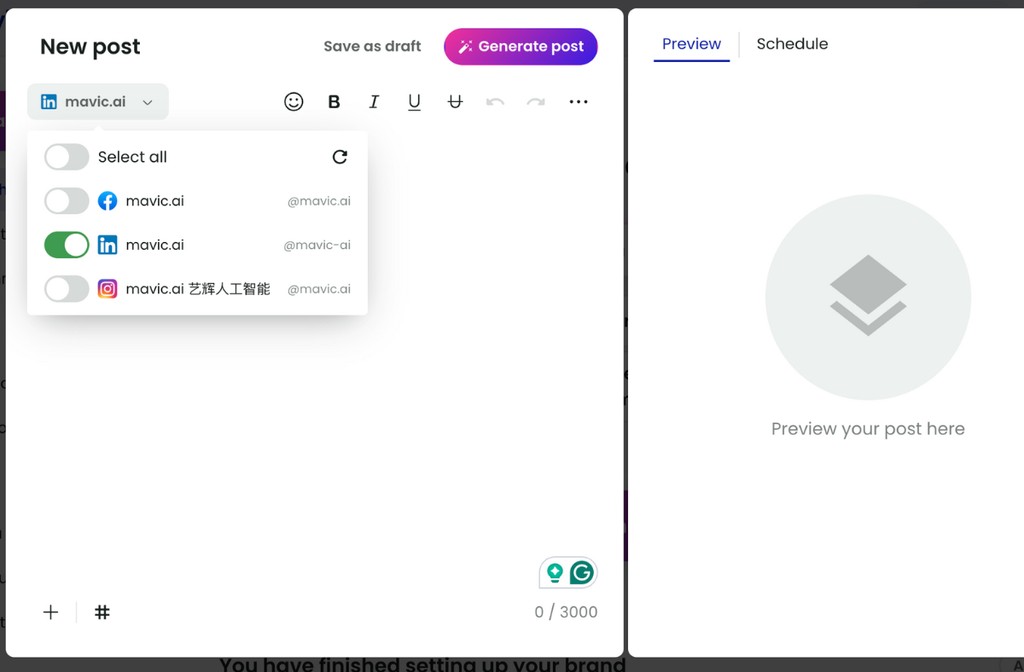
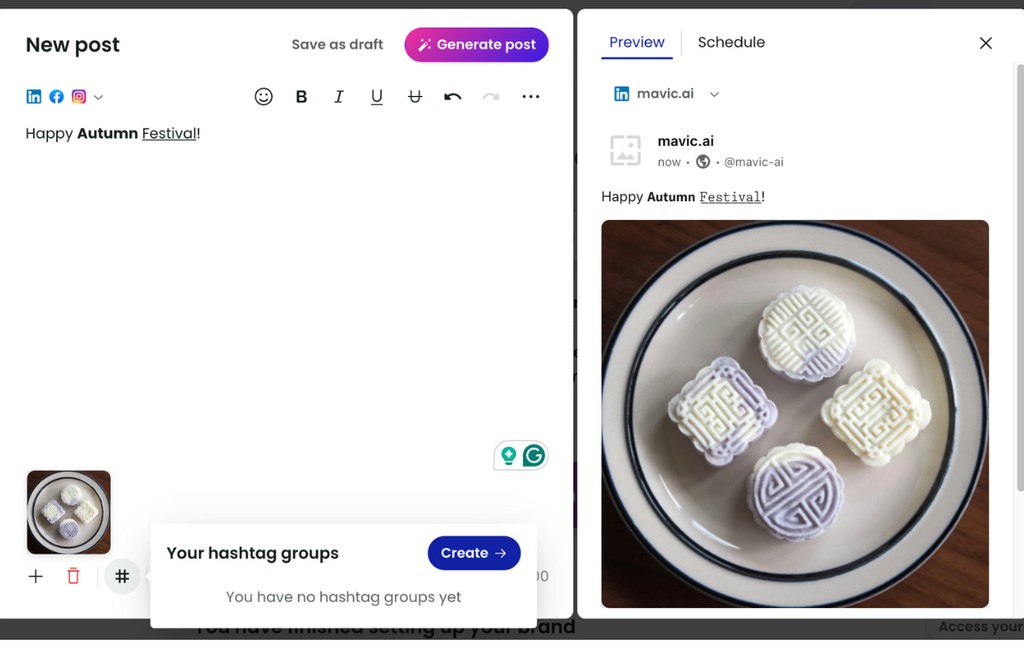
Content editor now allows for text formatting, and uploading your own hashtag groups.
Decided to customize your content for each channel instead?
Split channel customization
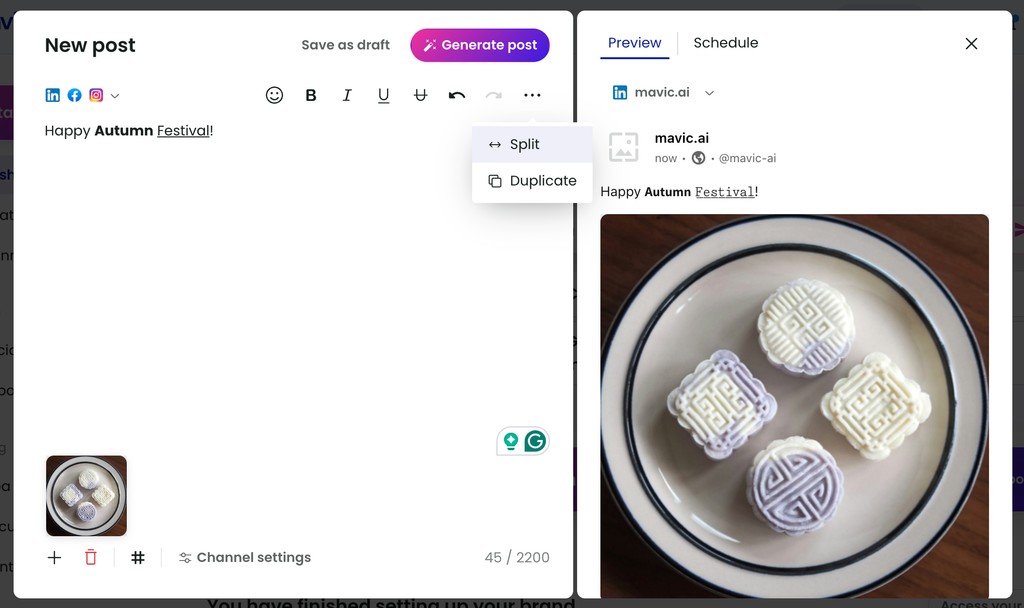
Edits can be made specific to each channel after the content is split.
If you want to see what’s next on our product roadmap, head over here for more details!
New feature release - generate blogs with a few clicks! 🎉
2024-08-28
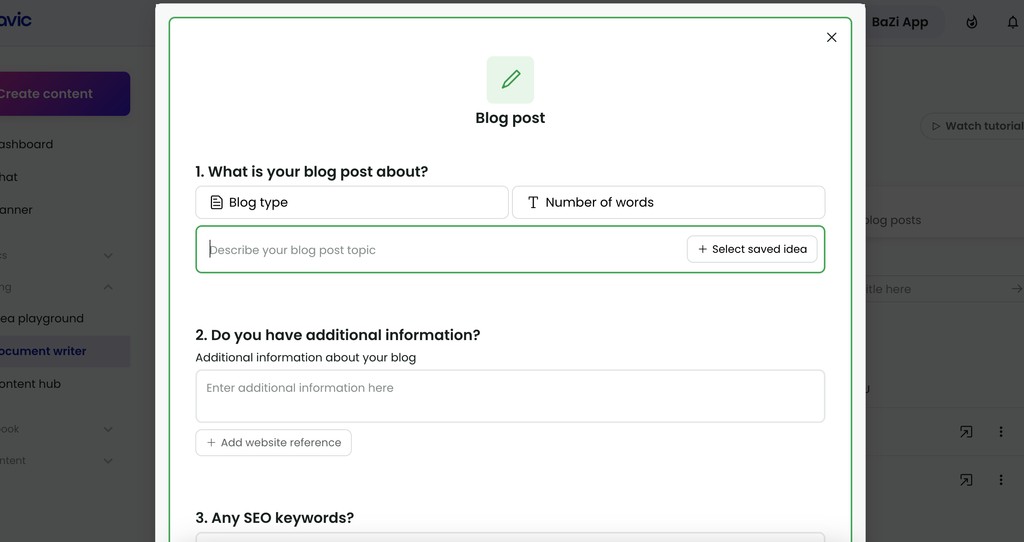
A new way to co-author content - mavic’s document writer 🪄
Need blogs? Now you can work with mavic to co-author blog posts with just a few clicks!
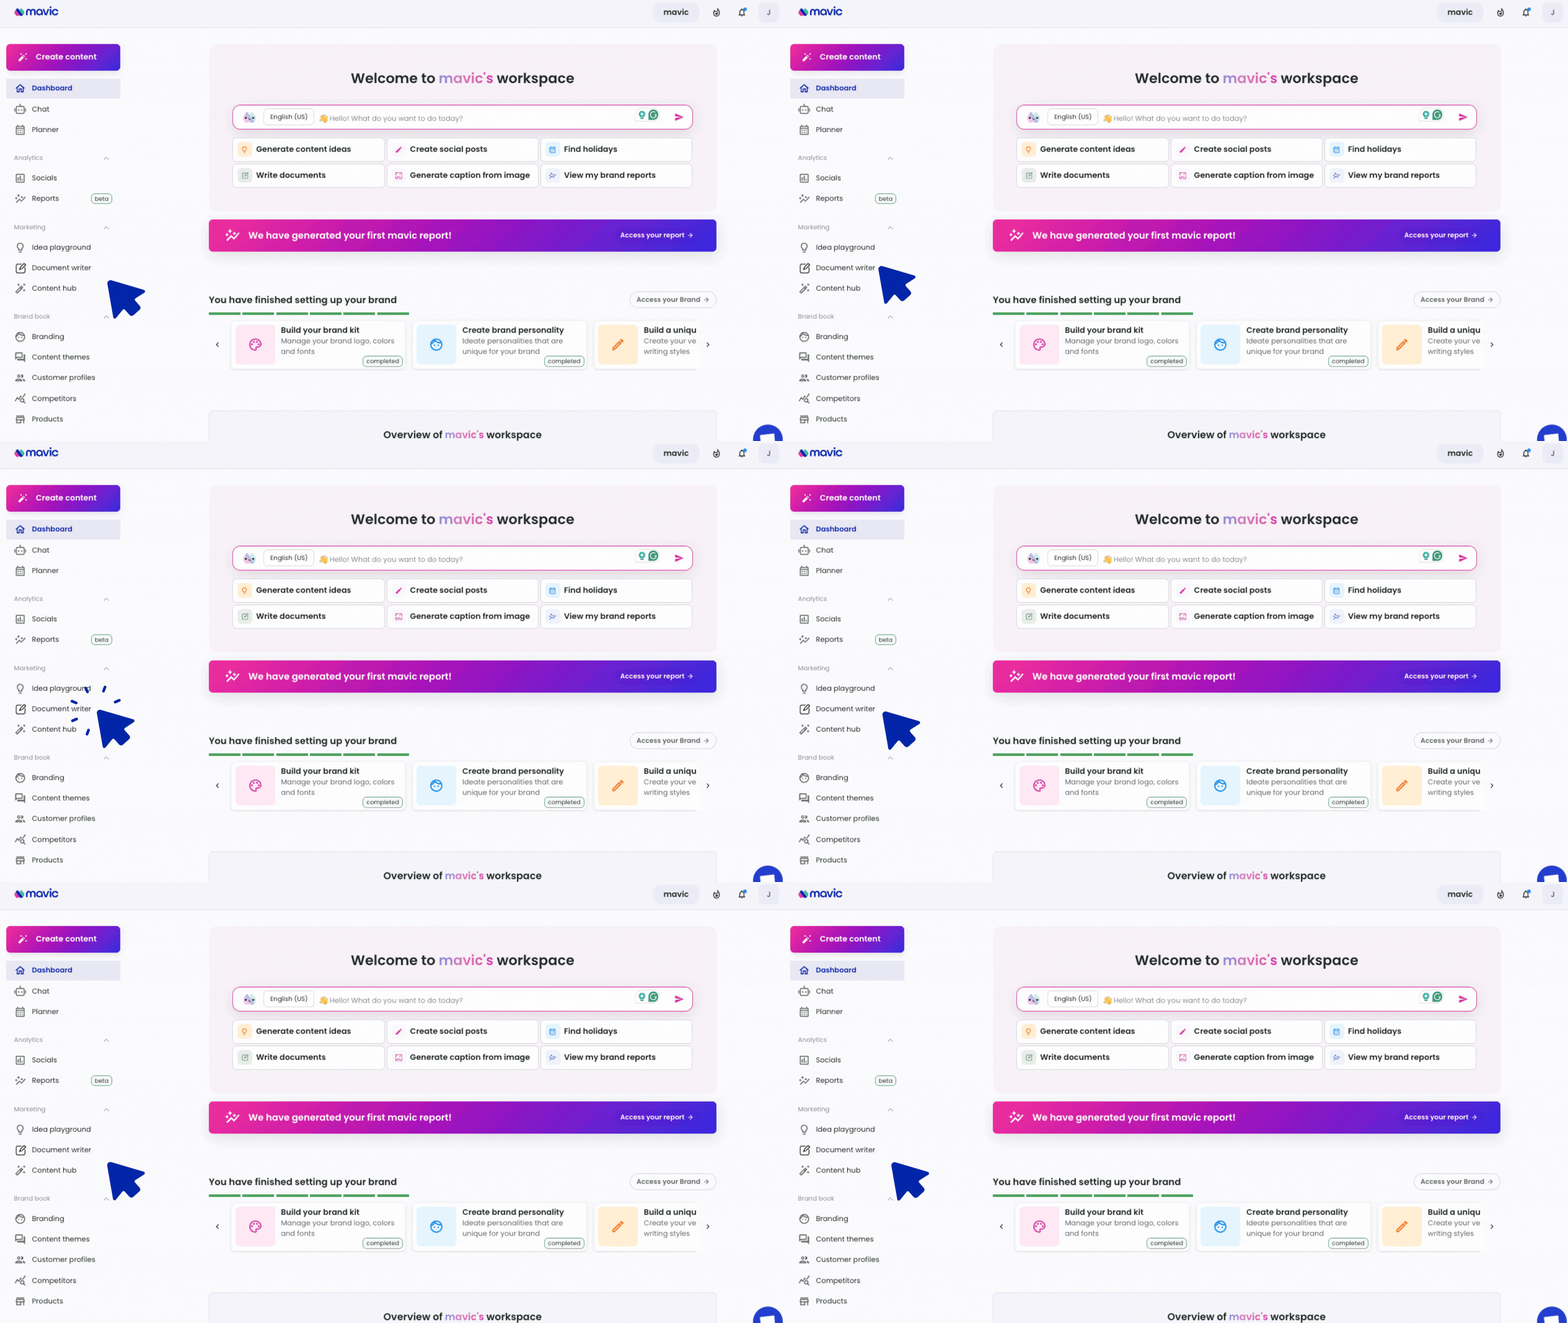
Where to find it?
Look for document writer under Marketing module.
What are the features of document writer?
Select topic from saved idea
Automatic web research
AI document assistant
Rewrite with AI
In-place editing
SEO analysis
Outline generator
Integrations with images and videos
Comprehensive text editing capabilities
Comes with over 30+ blog type templates and writing styles
Watch the tutorial here to get the full rundown!
We hope you find the document writer useful for your daily marketing needs! If you have any requests for even better features, please send them our way at hello@mavic.ai!
A smarter dashboard for a smarter you 🤓
2024-08-05
Surprise! Our latest product update is all about getting you better and faster intelligence. Read on to find out more ⚡
Presenting… our dashboard facelift 🚀
To provide you with a truly customized experience, each workspace is now personalized to your brand, and equipped with data to help you understand how your brand is performing across all channels.
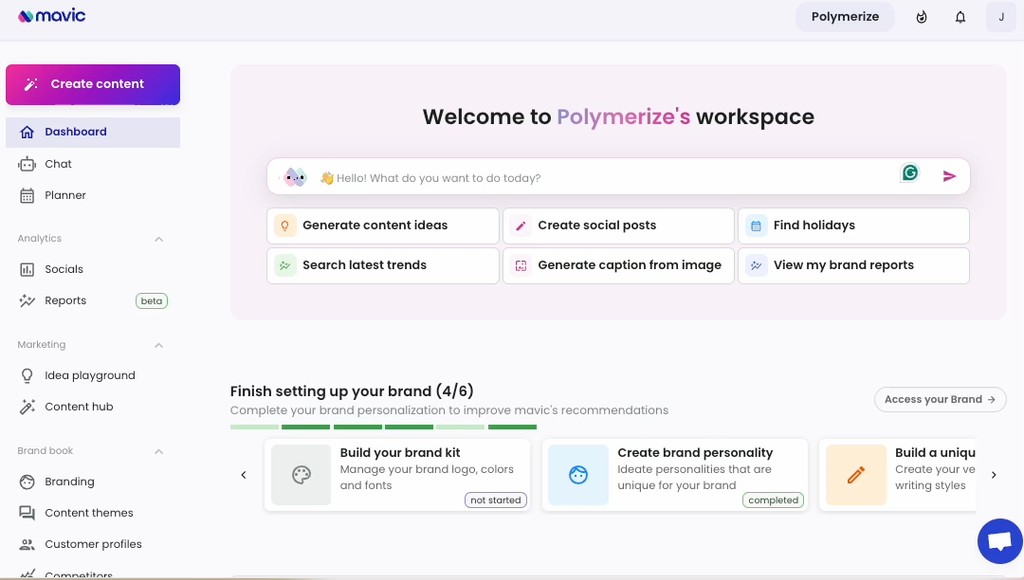
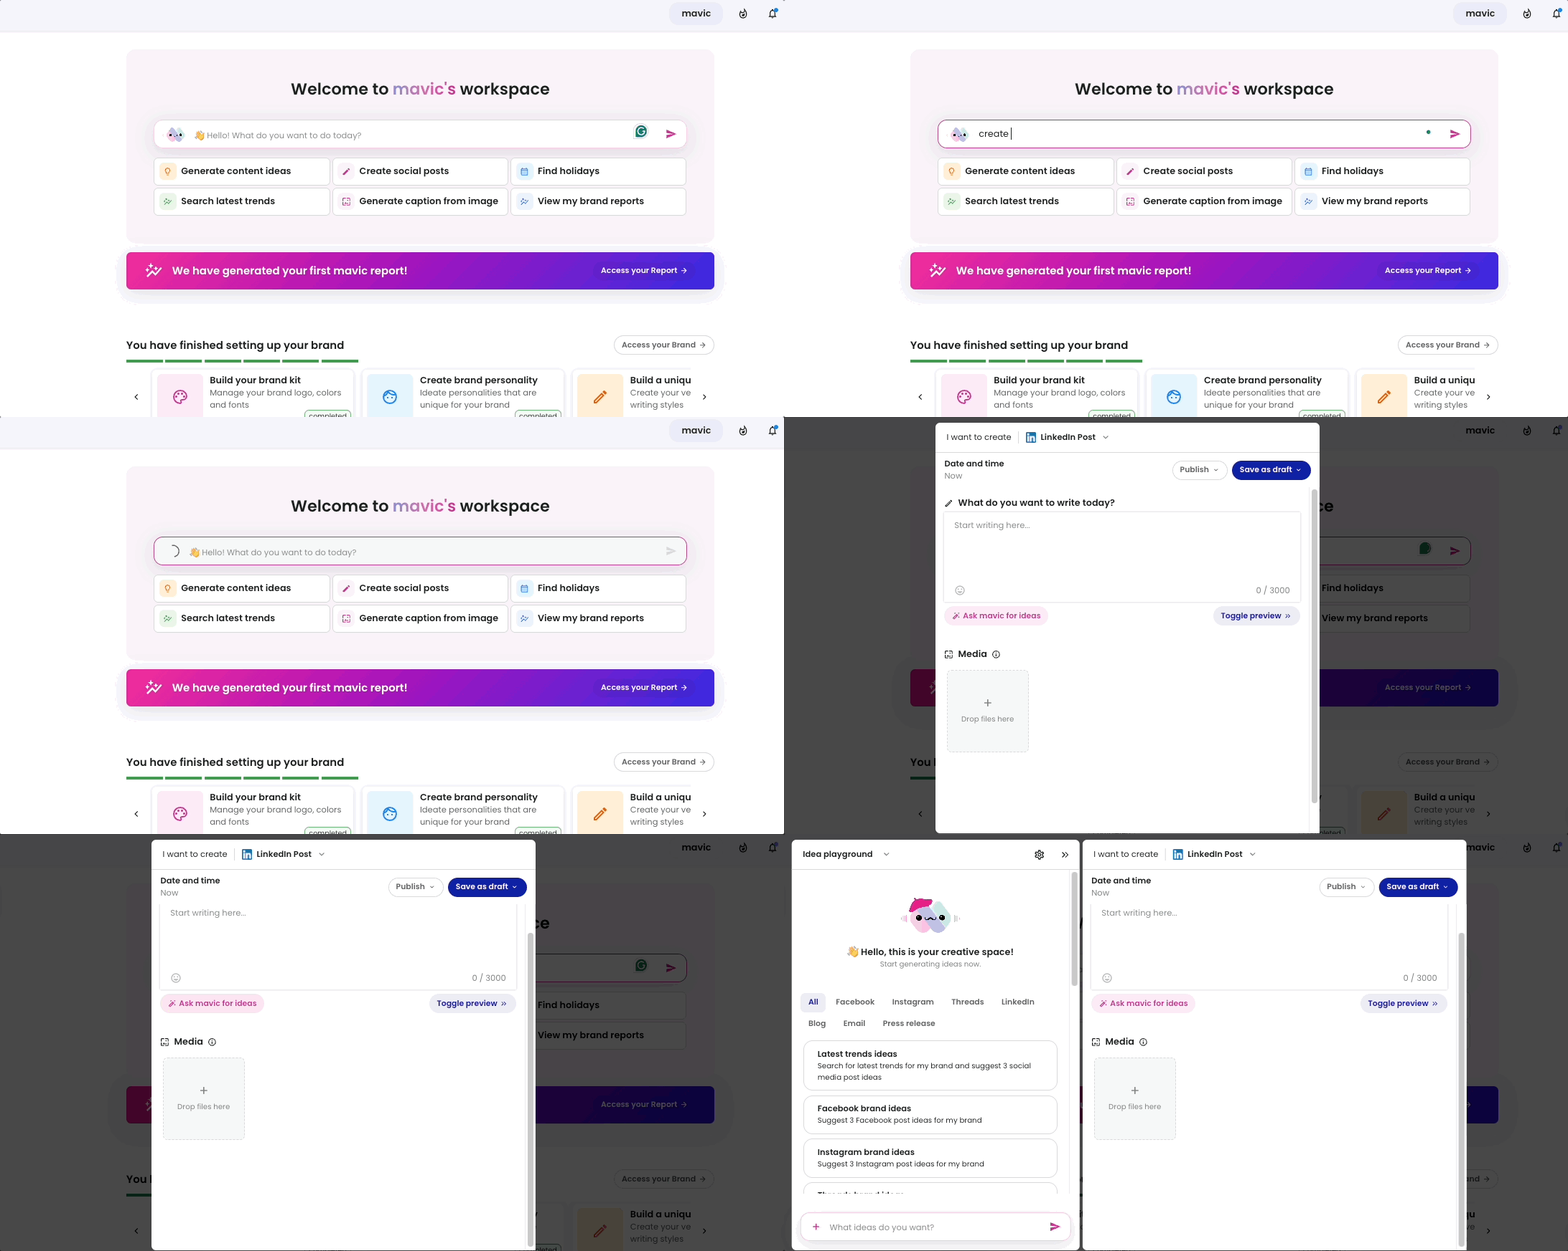
This new dashboard has also been given AI superpowers, mainly:
🔹 Superchat: this chat will help you navigate to the different parts of mavic. Need a social post? Simply tell chat and it’ll toggle the social content creation workflow for you.
🔹 Brand setup: want better ideas and content that sound exactly like your brand? Don’t leave your brand setup incomplete! This section helps you ensure your brand gets the love it deserves ❤️
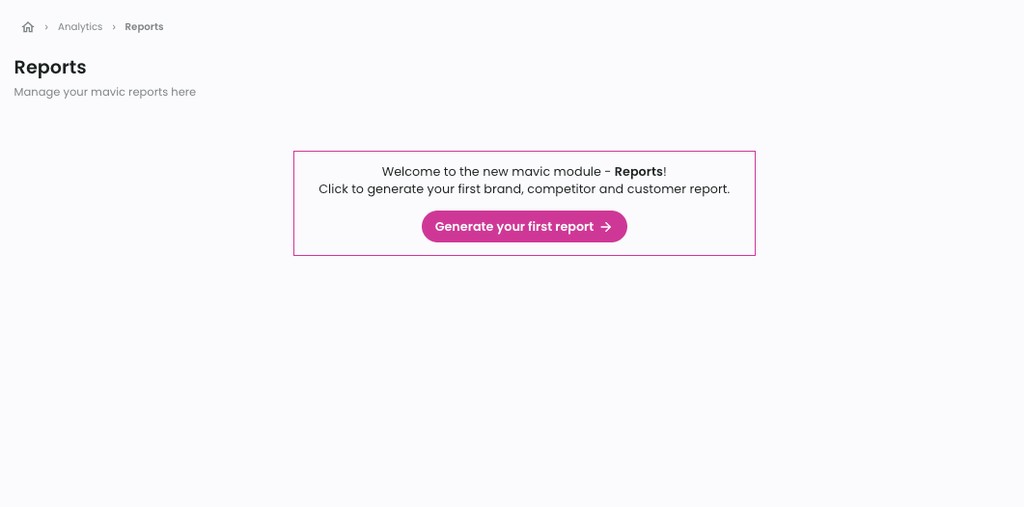
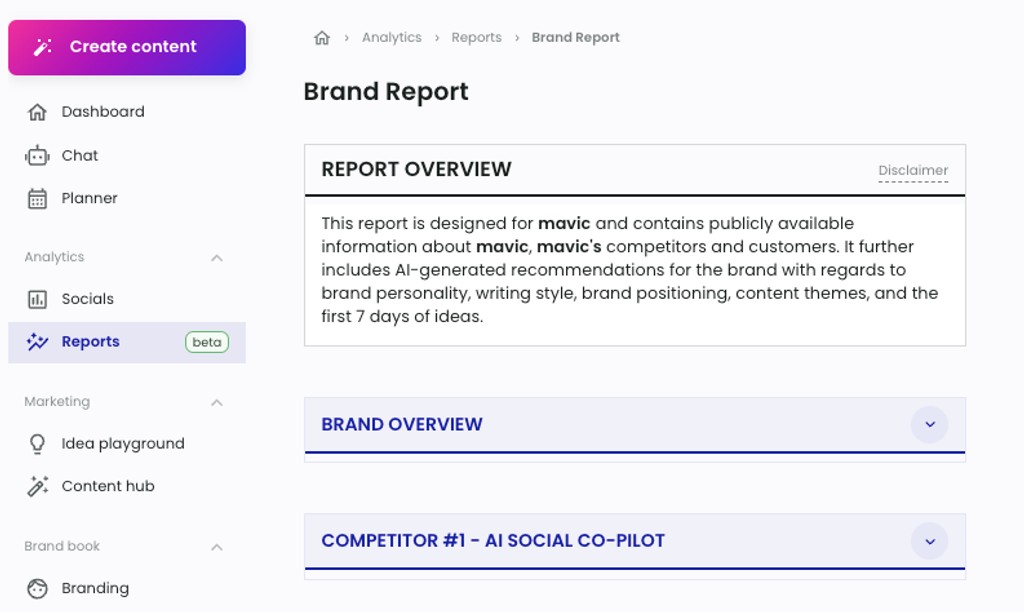
🔹 Brand report: what if you’re not sure how to setup your brand? With our beta brand report, mavic automatically helps you:
Analyze your brand 👀
Research your competition 📚
Gives your customer profile recommendations ✨
Suggests your brand personality ✨
Crafts your brand positioning ✨
Creates your content themes ✨
Provides you 7 days of content ideas to kickstart your marketing! 🔥
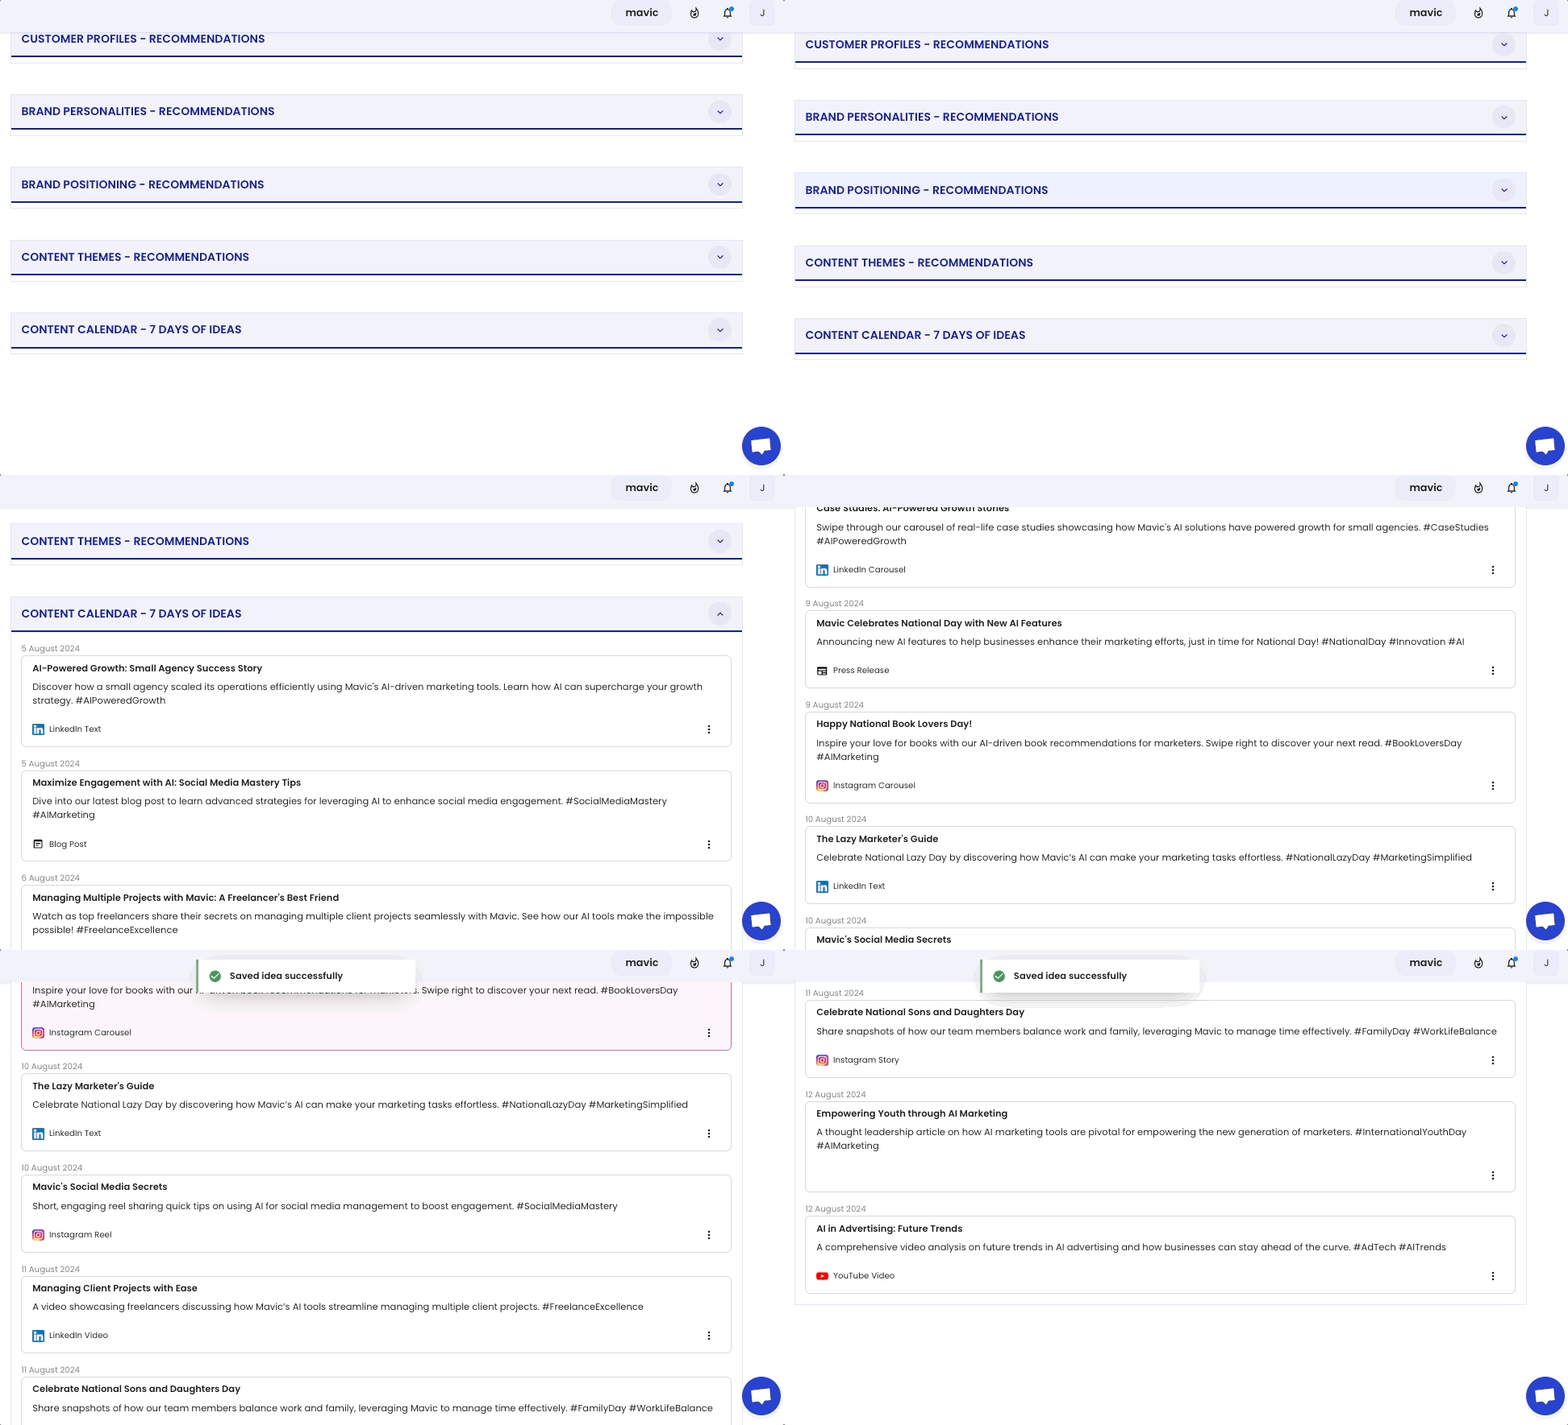
Ideas can also be saved to your Planner, or used to generate content for supported formats immediately!
Looking for more analytics? 🎯
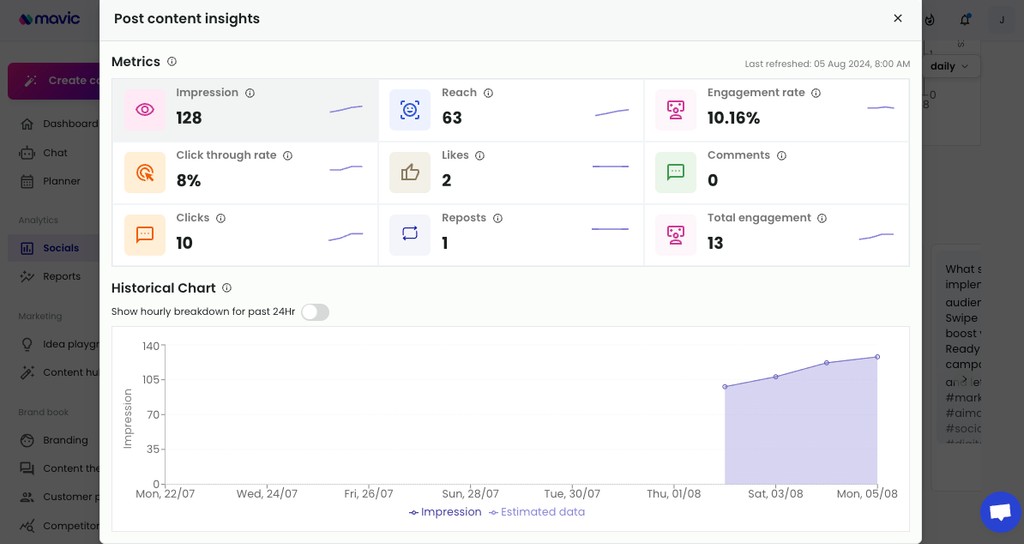
We’ve enhanced our LinkedIn social analytics module with post insights! Here’s the complete list of LinkedIn metrics available via mavic:
Total followers
Total posts
Channel impressions, reach, engagement rate, clickthrough rate, likes, comments, total clicks, total reposts, total engagement - daily breakdown
Post impressions, reach, engagement rate, clickthrough rate, likes, comments, total clicks, total reposts, total engagement - daily and hourly breakdown

We hope you find the smarter mavic useful for your daily marketing needs! If you have any requests for even better features, please send them our way at hello@mavic.ai!
Video publishing is now available!
2024-07-19
🎉 Enhancement alert for our social media publishing module! 🎉
Users can now upload videos and schedule them for publishing via mavic! To start publishing your videos, follow these steps:
Click on ‘Create Content’ in our main dashboard

Select any of the available social media channels - Facebook, Instagram, Threads or LinkedIn.

Under media, click on the + button to toggle the options to select media from uploaded brand content or to upload from computer directly.

Once content is ready, you can save the content to the Planner by choosing a date in the calendar.

Alternatively, you can publish immediately or at a scheduled date and time!

At the moment, acceptable video formats are:
mp4
less than 30MB
a data retention policy of 30 days will be applied towards free users
Got any ideas you think would make mavic even more magical? Send them our way at hello@mavic.ai!
Get social with mavic
2024-07-10
We’re getting smart. 🤓
You can now see your channel performance on LinkedIn 📈

Monitor your page growth via mavic with our new Socials module, which is found under Analytics on our side menu.
Data can be retrieved up to 12 months from today, and visualized in either daily or monthly format.
Start posting your brand updates to Threads

We’re officially integrated with Threads! To connect your Threads account, follow these steps:
Go to integrations on the left menu
Connect your threads account
That’s it!
Social publishing can be done in one click 🖱️

You can select the relevant social channels from our content editor dropdown. Choose from Facebook, Instagram, Threads and LinkedIn. The following content formats are supported:
Text only
Single image + text
Multiple images + text
PDF for LinkedIn - new release!
Apply your brand automatically on carousels 🔥
Want to get even more branded carousels? Automatically generate branded mavic carousels by updating your brand kit.
Mavic carousels can automatically replace the following brand elements:
Brand logos
Brand websites
Brand fonts
To set up your brand fonts, follow these steps:

Go to branding on the side menu
Access your brand kit
Add your brand fonts. Remember to add them as ‘Headline’ and ‘Subheadline’.
Save! Unsaved changes will not be recorded.
Go to mavic carousels and watch the magic! 🪄
Got any ideas you think would make mavic even more magical? Send them our way at support@mavic.ai!
😉📘
2024-07-02
Today, it’s all about 😉📘.
In other words…
🎉 Facebook publishing is now available!! 🎉
Add Facebook under Integrations
You can now connect your Facebook page to Mavic, alongside Instagram and LinkedIn social channels!

Create and Schedule Immediately 🖌️
Start scheduling your first post via mavic by clicking on ‘Create Content’ on our side panel. Select the Facebook Post from our top menu dropdown.

Transform your thoughts 💭 into Facebook captions
Start crafting content for Facebook by using our ‘Generate Caption’ quick create feature. Just type what you need in the text window, select all and click on ‘Generate caption’ to select any one of your saved writing styles.

💡 Need content ideas?
Let mavic help! Click on our magic pink ‘Ask mavic for ideas’ button to access our idea playground to get quick suggestions on what to create.

Got any ideas you think would make mavic even more magical? Send them our way at support@mavic.ai!
🚀 Chat with mavic, enhanced idea playground and banlist 🚀
2024-06-20
We’re enjoying the process, are you? 😁
Yes, we’re releasing yet another set of awesome features, and this is definitely the most awesome ones yet. ⚡
We couldn’t have come so far without the support of this community, so if you’ve not yet subscribed, what are you waiting for? Anyway, presenting our latest features lineup
🥁 drumroll 🥁
Chat with mavic is now live 🪄
This is still in beta, but through chat with mavic, you can get all the benefits of ChatGPT 4o, but enhanced with all your brand information and data. Chat is designed to help you easily retrieve any information relevant to your data, and give you quick insights rapidly. Literally like an AI brand marketer who is ready to be your companion at any time in the day!

mavic can help you do google search, read websites, come up with creative ideas, and even impersonate your customers so you can have a conversation with them!

That’s not all, through chat you can transform any insights to content ideas that can be used within mavic!

Writing styles enhanced with banlist
(only available to subscribed users)
No one wants to sound like a robot. That’s why we’ve built a banlist feature to help you remove all those pesky AI-sounding words you don’t want for your brand.
Simply navigate to your brand book, and look for banlist. We’ve even provided an initial list of commonly used AI words that you can copy and paste into your own settings.

Remember that the more you finetune mavic, the more mavic can learn to sound exactly like your brand. Have fun with this feature, we sure did! 😁
Carousel Templates are now made for your brand
Carousels from mavic will now be generated with your logo, your website and very soon, in your brand colours!
If you have configured your brand kit within brand book, carousels created through Magic Generator will automatically pick up your logo and website so you have publish-ready content that’s perfectly crafted for your brand!

Content editor is as simple as type-and-click
Sometimes all we need is a simple post. And with mavic you can.
Click ‘Create Content’, choose what content you need, and type in your instruction. Then simply use the mavic translator to generate caption with the writing style of your choice.

Idea playground is now enhanced
Great ideas are contextual, requires research and need to be relevant to your brand. That’s why we’ve also enhanced our idea playground with functionalities similar to chat. Now you can do your market research before using it for idea generation!

That’s all for now, but we have some even more exciting features in the pipeline. Look out for the following in our upcoming release!
Social integrations with Facebook
Social performance tracking
Apply brand colours to content
Got any ideas you think would make mavic even more magical? Send them our way at support@mavic.ai!
🚀 mavic 2.0 - building the world's first AI brand marketer 🚀
2024-05-14
Sit tight, this time it’s more than just a UX change, it’s marketing magic. 🪄
Creative thinking made easy with 🔥idea playground🔥
We’ve introduced a creative space to help businesses think of on-brand and relevant content ideas. With the chat interface, you can easily command mavic with any requests for creativity.

An 🔥AI-Powered Planner🔥 that ideates, creates, schedules and publishes content
We spent a bit of time on this, designing an interface that could make content creation easier, more flexible and fun for our users.
The planner is a workspace for you to:
✅ Add all upcoming marketing events as notes
✅ Create and schedule ideas
✅ Create, schedule and publish content to connected social media channels!
✅ Rearrange your content plan with drag and drop interface
✅ Access idea playground without navigating away

Convert ideas to content with just one click ✨
Easily select any saved ideas from the planner and change them into content. This feature supports:
✅ Social media captions
✅ Longform content - blogs, emails, press release
✅ Carousel generation from brand templates

While we do not have AI image generation yet, we’ve connected mavic to high quality stock image platforms to help find the most suitable images to complement your idea.

Let your creativity have free reign with our image editor 🎨
✅ Full control over content
✅ Access brand kit and uploads for easy content designing
✅ A library of templates for all marketing needs

Personalized 🔥brand strategies🔥 in minutes
We’ve enhanced the brand personality feature with 2 new branding frameworks - Carl Jung and MBTI. You can also now provide your feedback and inputs to mavic according to what you like about the recommendations.

🔥Custom writing styles🔥 designed for any brand voice
You can now create multiple writing styles for your brand, all to your liking! Different writing styles can be selected during content generation based on the required tone.

In case you didn’t notice, we’ve also embedded some fun little easter eggs into the platform. 😝 Our goal is to design a truly made-for-brands marketing system that will enhance your creativity while being a great productivity assistant.
As always, we’re on the lookout for ideas on how to help you market better. If you have any suggestions or feedback, please email us at support@mavic.ai.
Cheers!
🔥 Announcing mavic 2.0 🔥 UX makeover, Instagram publishing and branded uploads
2024-04-05
Is it just us or does something look different around here? 👀
🎨 UX makeover: More intuitive and consistent look-and-feel
After receiving much valuable feedback, we made enhancements on the platform’s user interface, making it easier to navigate the platform!

With this new change, you will be able to easily access your Brand information and make refinements on-the-go!
We love your valuable feedback, and are always constantly challenging ourselves to make the platform better.
Feel free to give it a try, and drop your feedback or suggestions at support@mavic.ai! Thanks! 🤗
🗓️ New Feature: Instagram publishing is now available!
Finally, Instagram publishing is now available! ⚡⚡⚡
You can now publish Instagram Carousel and Instagram Image to Caption posts directly from mavic!

And of course, you will be able to view all your published posts in the Content Calendar.
Note: The integration feature is available only on paid plans.
🌈 New Feature: Upload and use your images in image editor
We are excited to bring you the Uploads functionality. Now, you can easily upload your image files onto the platform and directly use them in our Image Editor when generating content assets!

Once you have uploaded your images, you can add them to your content assets directly from the Uploads panel within the Image Editor!

Note: Users on free plan have a maximum storage limit of 100MB.
📢 Announcement: we’ve retired projects!
After much consideration, we have decided to retire projects from the platform to make things seamless for our users. All data has been successfully migrated so you shouldn’t experience any functionality lapses. 😊
👀 What’s Next?
Here’s a sneak peek of the list of upcoming features we’re working out:
New and improved Branding framework to ensure your content always sound on-brand every time!
Schedule the publishing of your posts
Watch out for more of our Content Calendar enhancements!
And many more…
🥰 We hope you like the updates that we have rolled out!
If you are facing issues or have suggestions on how to better improve the product, please email us at support@mavic.ai.
Cheers!
📢📢📢 Get on the brand-wagon with our latest feature drops!
2024-03-19
😎 We’re getting on the brand-wagon.
🎨 New Feature: Upload your branded templates
Need content quick but don’t want to spend time update brand fonts and colours every single time? With branded templates, easily apply your unique brand templates to all generated content. This is found within the brand kit in our image editor.

Simply click on your brand template and it will apply onto your content asset automagically.
Currently, you can raise a request to the mavic team via email (support@mavic.ai), and we will upload your brand templates for you.
🗓️ Feature Enhancement: Image previews & holidays within content calendar
The Content Calendar is enhanced with a newer look which provides image previews for all your published posts.

Click each asset to expand and view the full content.

Public holidays are now available - select the country of your choice and they will appear as green tags on the content calendar, and help with future ideation!
🌈 Enhanced Feature: Add images to LinkedIn text posts
LinkedIn Text Post Generator now allows you to add images! Once you turn on ‘Edit’ mode, click on the “Add image” button, select your image files and click Publish.

👀 What’s Next?
Here’s a sneak peek of the list of upcoming features we’re working out:
Publish Instagram posts with image and text
Schedule the publishing of your posts
More Content Calendar enhancements
Brand colors recommendation
And many more…
🥰 We hope you like the updates that we have rolled out!
If you are facing issues or have suggestions on how to better improve the product, please email us at support@mavic.ai.
Cheers!
🎉 Major Update 🎉 Magic Generator, Image-to-Caption, Instant content preview and more!
2024-03-05
It’s a 🔥🔥🔥 week!
⚡ MAJOR Refresh: Content Hub
Guess what… We have decided to revamp the entire look-and-feel of the Content Hub! Now it looks so much better! We hope you agree too! 🥺🥺🥺

We’ve added a favorites tab for you to mark frequently used content within the Content Hub.
✨ Major Refresh: Introducing the Magic Generator 🪄
Now you can preview your created content on-the-fly.
When you choose a content asset type you like to create, a brand new Content Editor interface awaits you.

Within this Content Editor, you can:
Ideate and generate assets in the Magic Generator left panel
Review and select previously generated assets in the center panel
Do your final text/image edits and publish the selected asset on the right panel
All content editors for all other content asset types such as LinkedIn Text Post, Instagram Bio, Instagram Carousel, X Bio, Quotes, Email Marketing and Press Release have also been updated. 😇
🔥 New Feature: Google Ads Preview
Don’t know how to evaluate dynamic Google ads? We’ve got you. You can now preview the combination of headlines and descriptions and see how your ads show up on Google.

🌈 New Feature: Instagram Image Caption Generator
You can now upload your brand’s or product’s image and let Mavic auto-generate an Instagram image caption that caters to your brand or product!

We are working hard to bring in the feature to publish to Instagram directly! For now, you can publish to the Content Calendar.
✌️ Enhancement: New YouTube About Page Styles
More style variants are now available for creating YouTube About descriptions
Storytelling and Narrative
Personal and Vlog-Style
Thematic or Niche-Specific
Mysterious or Enigmatic
Philosophical or Thought-Provoking
Futuristic or Sci-Fi Oriented
Retro or Vintage-Themed
Minimalist or Abstract
Poetic or Literary
Satirical or Parody
👀 What’s Next?
Here’s a sneak peek of the list of upcoming features in the pipeline:
Content Calendar updates - watch out for this!
Brand colors recommendation
Publish Instagram posts with image and text
Publish LinkedIn posts with image
Schedule the publishing of your posts
And many more…
🥰 We hope you like the updates that we have rolled out!
If you are facing issues or have suggestions on how to better improve the product, please email us at support@mavic.ai.
Cheers!
🎨 Brand Kit, Quotes and New Instagram/LinkedIn Carousel Styles
2024-02-20
⚡ Save time on branded content with our latest feature drops! ⚡
🌈 New Feature: Brand Kit
You can now add in your Brand Colors and Brand Fonts under the Brand Kit page.

Is that all? No!
You can also use them directly in the Image Editor to style your content assets! Features include:
Apply your brand colors onto elements
Create text elements using your font styles
Apply your font styles onto text elements

👀 Psst… This feature is still work-in-progress, but we wanted to show you a preview of how it can be used. Stay tuned for more enhancements to come!
🔥 New Feature: Quotes
We’ve added generation of Quotes content asset in the Content Hub.
Create quotes in different styles such as Inspirational, Love, Motivational, Philosophical, Humorous, Poetic and more!

🎉 Enhancement: New Instagram Carousel Styles
We’ve added more styles to generate your favorite Instagram Carousels!
Routine guide to _______
Spotlight on customers
Product announcement
Behind-the-scenes to _______
✨ Enhancement: New LinkedIn Carousel Styles
More style variants are now available for creating LinkedIn Carousels!
How to guide to _______
Routine guide to _______
Spotlight on customers
Product announcement
Behind-the-scenes to _______
🛠️ General Improvements
Improved website’s mobile-responsiveness
Please go ahead and try them out! If you have suggestions on how to better improve the product, please email us at support@mavic.ai.
Cheers!
✌️😎 New Features: Brand Name Ideation, Product Catalogue and Content Themes! 😎✌️
2024-02-13
In case you haven’t noticed.. here are the latest feature drops 🔥
🌎 Are you a non-profit?
Because now you can assign it to your brand!

We also offer a 50% discount on licenses to all nonprofits. Read more here.
🔥 Enhancement: Brand Name Ideation
You can now come up with brand name ideas using interesting styles such as Elegant, Quirky and Futuristic, while at the same time, permutate with different number of syllables and words!

💥 New Feature: Product Catalogue
Need to promote the same product across different content pieces? Now you can create your own product catalogue and use them within the content hub!

🎉 New Feature: Content Themes
Fact. Great branding comes from consistency. The latest Content Themes module is designed so that you can ideate unlimited ideas but within the same topics that are relevant to your brand.
With this, you can now select your desired content theme when generating content assets, and deliver consistent brand messaging — anytime, anywhere.

Please go ahead and try them out!
Feel free to contact us at support@mavic.ai if you have any further questions.
Cheers!
🚀 New LinkedIn Text Post Generation and More Content Styles! 🚀
2024-02-06
Here are the latest feature drops 🔥
🔥 Added LinkedIn Text Post Generation and Publishing
You can now generate LinkedIn Text Posts with 8 different content styles!
Posts can be directly published to your connected LinkedIn pages.
✨ Added 5 New Instagram Bio Content Styles
Here are more variants of Instagram Bios for your selection ~
Storytelling
Personal and Relatable
Informative and Educational
Quirky and Unique
Call-to-Action Focused
✅ Added 5 New Instagram Carousel Content Styles
We have also included 5 additional content styles for generating different Instagram Carousel ideas and templates.
5 questions often asked to us
5 __________ recommendations
5 product features you can’t miss out on
5 service features you can’t miss out on
How to guide to _______
🎉 Added 5 New LinkedIn Carousel Content Styles
And finally, 5 more new content styles for creating more awesome LinkedIn Carousels!
5 _______ hacks
5 questions often asked to us
5 __________ recommendations
5 product features you can’t miss out on
5 service features you can’t miss out on
Try them out and feel free to contact us at support@mavic.ai if you have any further questions.
Cheers!
Welcome to mavic.ai - Let's get started! 💫
2024-01-30
We took the plunge and pushed a button, and now we’re live! Mavic is designed to specifically help brand owners and marketers in:
Branding | Providing recommendations on your brand personality and positioning.
Customer Profiles | Crafting customer profiles and share with you some real user statistics.
Competitor Analysis | Beyond tracking your competitor's web traffic, we also analyse their positioning to help you find your competitive advantage.
Marketing Ideas & Content Creation | This is where the fun is! We help find ways to create creative content that still reflects your brand values and business needs.
Content Design and Publishing | Once you've made an asset you love, publish it directly to LinkedIn (for now, other channels are on the way).
Join us now and sign up here.